Infusion therapy (drip), like bolus (jet), refers to the intravenous parenteral method of delivering drugs to the body. Both methods are used for emergency conditions. However, a dropper is used when long-term, low-speed administration and large-volume intravenous infusions are required.
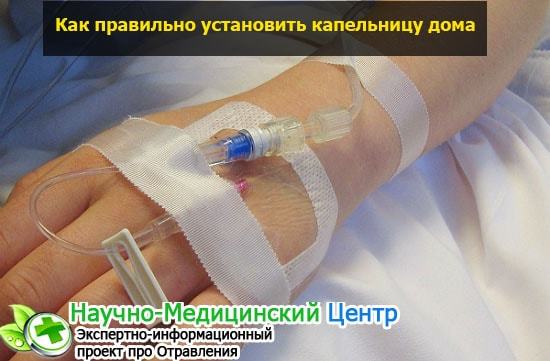
The procedure is not easy for a beginner, and if the rules of asepsis and technique are violated, it can lead to extremely dangerous consequences. In this article we will talk in detail about how to install an IV yourself at home.
In what cases is it possible to independently install an IV at home?
The list of diseases for which a dropper is needed is huge, but not all intravenous infusions can be performed independently at home. When and what procedures are permissible to carry out if you know exactly what you are doing?
When the health condition is not urgent - that is, it is not severe poisoning, injuries, crises, etc. - it is possible to independently install IVs outside hospitals for the following purposes:
- Elimination of deficiency of vitamins and microelements, restoration of the overall tone of the body. Here we use a solution of 0.9% NaCl with glucose and vitamins B2, B1, C, B6, E, PP and cocarboxylase (CCB).
- Blood cleansing from alcohol intoxication. In such cases, a composition of saline solution (0.9% NaCl) and 5–10% glucose is used. The event is aimed at reducing the concentration of ethanol, thinning the blood and eliminating dehydration. In this case, toxic substances are excreted in the urine. It is possible to combine glucose with such drugs as Laktosol, Trisol, Disol. To cleanse ethanol, Mefusol, Reamberin, sodium thiosulfate with unithiol are also used.
- Minimizing the consequences of toxic damage to the liver, gallbladder and bile ducts due to alcohol or drug poisoning. For this purpose, hepatoprotectors are used - drugs, which in most cases include sodium thiosulfate or magnesium sulfate. Essentiale is popular.
- Replenishment of glucose deficiency. It makes sense to carry out such measures in case of vomiting, attacks of diarrhea, bleeding, general exhaustion, dehydration, lower blood sugar levels than normal, and some infectious diseases. In such cases, 5-10 percent glucose without impurities is often prescribed. However, when calculating the dosage, the general health condition, age category, clinical picture and body weight of the patient should be taken into account.
- Thinning the blood and forcing diuresis to normalize blood pressure may be required for cardiovascular problems. Typically, such preparations include folic acid, vitamins B6 and B12, sodium chloride and glucose. The last two components thin the blood without causing harm to the body, and also prevent blood clots. At the same time, toxins are removed from the body naturally due to the diuretic effect. Examples of such drugs are: hypertonic glucose solution (40%), sodium chloride, Furosemide, Torasemide, Mannitol.
In such situations, it is possible to carry out intravenous infusion of drugs yourself at home, but only after agreeing on the course of treatment and exact dosages with your doctor, for example, as part of rehabilitation at home after hospitalization. Self-diagnosis and self-medication are unacceptable here!
As for the drugs themselves, the procedure for their use in terms of intravenous administration is described in detail in the section of the annotation for the drug “method of administration and dosage”. There should be the phrases “IV drip”, “for infusion”, etc. If, in addition, the instructions do not say anything about the jet infusion method, i.e. the phrases “IV jet”, “for bolus administration”, etc. are absent, which means that in no case should you take this drug by intravenous injection - only with the help of a dropper.
Advantages and disadvantages of droppers
The administration of drugs through a dropper is a method of therapy that has its advantages and disadvantages. And an experienced specialist must take them into account before supplementing the treatment plan with such a procedure.
Benefits of infusion treatment:
- medicinal substances that are administered intravenously are absorbed by the body almost 100%;
- the effect appears quickly;
- low risks of side effects compared to tablets.
Flaws:
- traumatic method of administration;
- increased load on the heart muscle and kidneys due to the introduction of a large volume of fluid;
- the likelihood of infection during the procedure.
What to prepare for setting up an infusion system?
A wider range of items is needed here than for a conventional intravenous injection. The list of things you need to prepare to set up an infusion system yourself at home includes:
- A clean work surface is a small table, chair or bedside table with a plate or dish pre-sterilized with an antiseptic, where the necessary tools and materials are placed after opening the packages.
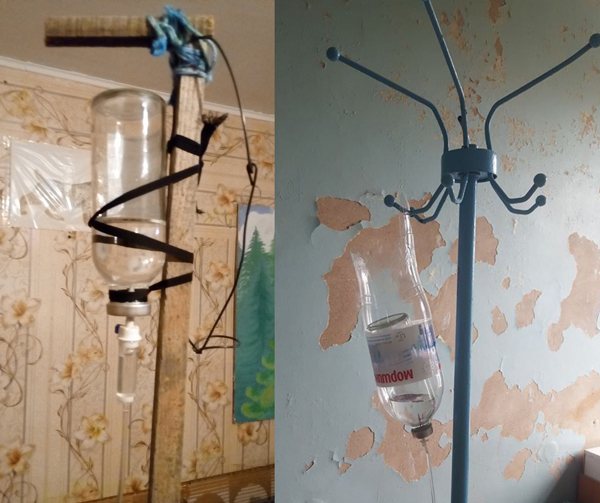
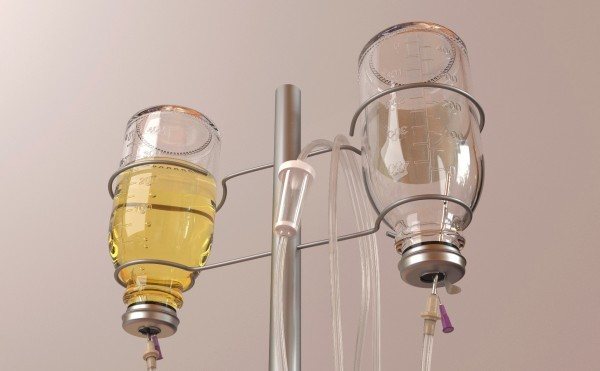
- Tripod. In medical institutions there are special tripod stands for this. However, if we are talking about setting up an IV at home, then you will have to improvise using improvised means. The main thing is to ensure that the height of the bottle is 1.5 meters from the floor.
- A bottle with a saline solution into which the main medicine is added.
- The actual drug for which intravenous infusion is performed.
- A sterile disposable syringe is intended for preparing a medicinal solution.
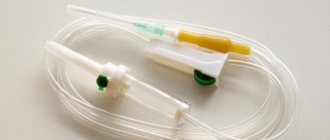
- An infusion medical system is a dropper. Regardless of the type and purpose, the device is always sterile and disposable, hermetically packed in a polyethylene bag.
- A catheter is used when course procedures take place at time intervals of several hours, so that new sections of the vein do not have to be punctured each time. This device is designed for a longer period of use, although from time to time it is necessary to treat it with a special composition, including heparin or saline solution. The purchase of the latter, if a catheter is used, should also be planned in advance when going to the pharmacy.
- Venipuncture tourniquet.
- Antiseptic liquid. Any antiseptic or simple medical alcohol 70% will do.
- Sterile cotton wool or gauze wipes for treating the skin at the site of venipuncture, disinfecting instruments and surfaces.
- A patch for securely fixing a needle in a vein. If you have previously experienced irritation when using certain types of patches, and the treatment is supposed to be a course, it is better to choose a hypoallergenic, non-woven one. “omnisilk” or something similar will do.
The above items must be prepared before the start of the IV procedure, and it is advisable to collect them in one place.
Now a little about how the infusion system-dropper itself works and what parts it consists of.
How to install an IV - Installing an IV at home, instructions, useful tips
Almost everyone knows what an IV is. But most people don't understand how they work, and even fewer have any idea how to place an IV.
Most of the time it is placed by medical staff. However, there are situations in life when a person cannot go to a medical facility or call a doctor at home.
In this case, you need to know how to use it correctly so that it does not harm your health.
When does it become necessary to put in an IV?

- This device is used to administer various medications, physiological products and vitamins.
- The I-dropper allows for better absorption of these elements in the body, and also reduces the risk of complications in the gastrointestinal tract.
You should consult your doctor before you start I-drip on your own. He will conduct all the necessary tests and prescribe medications.
This procedure is usually necessary to relieve the effect of a hangover, saturate the body with essential vitamins and for antibacterial therapy.
Saline drops are also used to help dehydrate a person.
There are a number of reasons why a tincture is necessary. For example, in case of stroke, diabetes or severe bleeding. They also use it in pregnant women if they have severe toxicosis.
Because women are in this position, some medications should not be given by injection due to the risk of abortion.
However, infusion therapy has its contraindications that must be taken into account, such as heart failure, the likelihood of blood clots and a tendency to edema.
Types of droppers

In medicine, there are several types of infusion therapy. The type of infusion directly depends on which solution is administered intravenously.
To remove harmful substances and toxins from the body that can be formed due to alcohol abuse, poisoning or infectious diseases, detoxifying droppers are used.
Detoxifying dropper is used for glucose saturation, high blood pressure, liver problems.
To improve the immune system after a long and serious illness, an anti-anemic drip is used.
There are also anti-cholesterol droppers that are used to normalize blood cholesterol levels and restore fat metabolism. In addition, the dropper is used for cosmetic purposes to improve the structure of nails, hair and skin.
Procedure for installing an IV
How to make an infusion into an apartment to avoid injury?
And also what additional equipment you need. In order for this procedure to be useful, only certain rules must be followed.
First you need to prepare all the necessary equipment. First you need to think about where the patient will be and what will be associated with the IV itself.
It is much easier in the hospital; there is a special counter for this. But there is no such device at home, but if desired, it can be made from convenient items. The most important thing is that it is firmly fixed.
Buying a kit is not very difficult. However, it comes in two versions, differing in the speed of fall. For example, a macro kit has a speed of 20 drops per minute, and a micro kit has a speed of 60 drops per minute.
However, in most cases a set of macros is used. They also vary in tube diameter. If a person requires urgent assistance, a larger diameter is selected.
In all other cases, a small tube is used. It is also necessary to choose a needle, the most commonly used needles for adults are 18, 19, 20.
You also need cotton, alcohol and a tourniquet. All necessary instruments should be stored in one place so that they are at hand during the procedure.
Next, you need to prepare the installation of the drop. You need to take the package with the medicine, find the place where the connection is made, and wipe it with alcohol.
If in doubt, the manufacturer provides detailed packaging instructions. The dropper is then connected to the solution.
After connecting, it is necessary for the solution to reach the end of the pipe, it is necessary to get rid of bubbles. When the drug reaches the end of the tube, the tip should be clamped.
After all the mock procedures are completed and the system is ready, you can begin the real procedure. The patient should take a horizontal position, but if desired, you can also take a vertical position if the patient feels comfortable.
Wash your hands before injection, dry them and put on disposable medical gloves. After removal, new gloves must be put on.
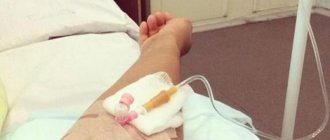
After this, you need to find a place to install the catheter. It is best to choose a vein that sits on the arm along with the bend. This is usually the easiest place to place the catheter.
Then an intravenous catheter is inserted with a needle, which must then be removed. The IV site should be pulled with a tourniquet to better see the vein and then the injection site should be disinfected.
The catheter is inserted at an angle of 45 degrees from the vein; after introducing blood, the angle should gradually decrease so that it is parallel to the skin.
It is necessary to pierce it another 2 mm and secure it after removing the needle inserted into it. Connect the intravenous tube to the catheter.
tips! Sterile spare gloves should always be comfortable, as touching non-sterile objects during the procedure will remove the old ones. And you wear new gloves during the procedure.
In order not to harm human health, you need to know how to properly set up the infusion. It should be noted that its placement must be in accordance with all rules.
However, to avoid complications, the procedure should be performed in a hospital under the supervision of a doctor or nurse, if possible.
How does a dropper work?
Drippers, based on the diameter of the filter cells, come in 2 types:
- For transfusion of medicinal solutions, they are marked “PR” on the packaging.
- For blood transfusion or blood substitutes - marked “PC” on the packaging.
Whatever model you use, its main parts and the principle of operation are always the same. The rest is just minor design differences.
A typical dropper from a pharmacy looks like this:
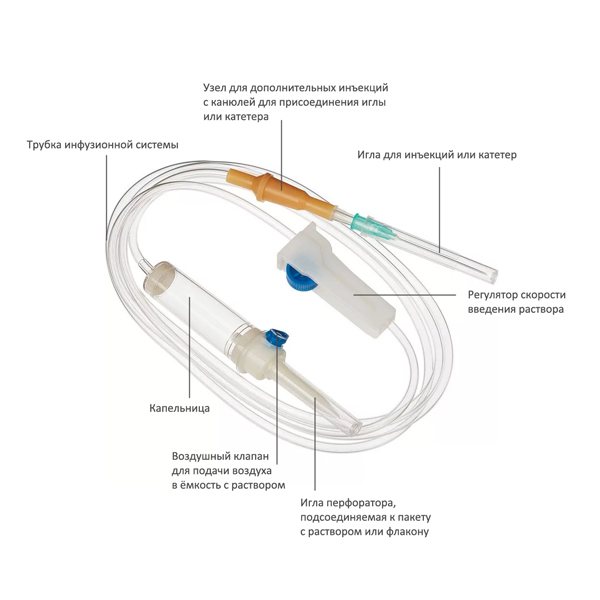
Intravenous drip device
- The punch needle with a protective cap on it is designed to connect the system to the bottle. They can be polymer or metal, which are designed to perforate the protective membranes (lids) of plastic or glass containers, respectively, but in fact any of them will fit any type of vial or bag. The other end of the perforator goes into the cavity of the dropper reservoir, and is a pipette, which is responsible for the formation of drops.
- The air valve is responsible for equalizing the pressure inside the medicine bottle by supplying air into it. If it is closed, no liquid will flow into the drip reservoir. This part may not always be present in the system; in inexpensive models it is sometimes missing. The presence of such a valve is possible in bags with saline solution, but also not always. If you haven’t found it, the problem can be solved simply: you just need to insert an injection needle from a spare syringe into the lid of the container, not far from the entrance of the puncher. But this should not be done in advance, but only when starting to directly fill the system. Otherwise, the liquid will start to pour out. Before placing the bottle on the stand and assembling the dropper, make sure that this valve is closed.
- The dropper is a small polymer reservoir equipped with a filter. The material from which it is made, as a rule, makes it possible to easily compress this container, working with it like a pump and thereby activating the flow of liquid.
- The infusion line is responsible for transporting the medication from the vial to the vein.
- The injection rate regulator determines the volume of drug delivery over a certain period of time. Before assembling the system, you must ensure that it is closed to prevent uncontrolled fluid flow through the tube.
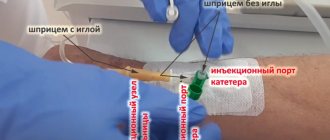
- Additional injection site, or port. It has a special cannula for attaching an injection needle or catheter (PVC). As a rule, the first one is already present in the port with a sterile cap on it. The material of this system unit is soft and elastic, designed for additional injections into its cavity. If you are using a PVC that has not yet been installed for previous infusions, then the needle can be replaced with it when assembling and filling the system. The port size is generally universal, but some catheterization devices have specific locks, so you should check the compatibility of the fastenings of both devices when purchasing.
- The injection needle serves directly for venipuncture. It has a protective cap, which should also not be removed until the device is completely assembled and filled.
Now you know how a dropper works and understand the principle of its operation. This means you can start assembling and filling the system.
More about the procedure
Many people think that IVs are given only to those patients who are in hospital, but this is not true. Modern specialists prescribe infusion therapy even for those patients who are being treated at home. After all, you can even cope with such a procedure yourself if you call a specialist from the clinic to your home.
The process of installing an IV is a complex task, so it is better to entrust it to medical staff. They use:
- the drip system itself;
- drug for administration;
- medical gloves;
- cotton wool, plaster;
- antiseptic;
- tourniquet;
- disposable syringe.
All stages of administering the infusion solution are carried out only with preliminary disinfection. If you are preparing for the procedure, here are some tips to help make the IV easier:
- lie down in a comfortable position with a pillow or small towel cushion under your elbow;
- try not to move or make sudden movements.
To make the procedure as comfortable as possible, you should tell the doctor about your health and sensations: this will help you set the correct rate of drug administration.
Filling the infusion system
Before filling the dropper system, you need to carefully read the instructions for the drugs, carefully check their expiration date and the tightness of the packages, inspect externally - color, transparency, sediment, etc.
A step-by-step algorithm for independent actions to fill the infusion system boils down to the following:
- Wash and pat your hands dry with a clean towel. Treat them with an antiseptic (70% alcohol).
- Wipe the lid of the bottle or bag of medicine with an antiseptic. Remove the protective valve from it and sterilize the opening area again.
- Using a disposable syringe, inject the essential medications into the saline container.
- Open the package and remove the infusion system. Close the plastic clamp of the solution flow rate regulator completely by moving the wheel. This is done to immediately shut off the flow of liquid into the system at the connection stage.
- Remove the cap from the plastic punch needle and insert it all the way into the bottle cap.
- Place the container with the medicine on the stand, turning it upside down.
- Open the air valve located at the base of the system's perforator and squeeze the drip chamber slightly with your fingers and then release. As a result, the solution should begin flowing from the bottle into the reservoir. If there is no valve anywhere in the resulting design, take a spare sterile injection needle and insert it almost the entire length into the cap of the vial.
- Now the liquid supply speed regulator should be opened all the way so that the solution begins to flow into the system.
- Remove the protective cap from the injection needle and hold it over the tray until the liquid completely displaces the air from the tube and begins to flow freely. This will fill the dropper. If you intend to use a catheter that has not yet been installed (for example, during a previous procedure), then first insert it into the port cannula instead of a needle. This must be done before filling the infusion device.
- Turn off the fluid supply speed control again and put the protective cap on the injection needle (PVC), place it on a sterile surface - a dish, napkin or tray.
- Prepare the necessary materials for venipuncture - pieces of sterile cotton wool, strips of tape to secure the needle (or catheter), and a tourniquet. Place a pad or cushion under the arm chosen for the procedure. You can roll a roller out of a towel if you don’t have such a special device at home.
The infusion set is now primed and ready for use.
Recommendations for infusion therapy
In the process of infusion therapy, the following recommendations must be taken into account:
- You should not start drip medications on a completely empty stomach. The only exceptions are emergency cases.
- The rate of infusion of the drug into the cavity of the venous vessel should be constantly monitored.
- After removing the needle from the vein, you need to lie down for 15-20 minutes, and also avoid abruptly getting out of bed.
- If signs of dizziness, nausea, or darkening occur, further administration of medications should be stopped.
- All stages of infusion therapy must be carried out under the supervision of a person with medical education.
Compliance with the above recommendations will help avoid the development of side effects and negative consequences.
Algorithm for placing an IV
After the above-described manipulations, you can begin an independent intravenous infusion procedure.
The algorithm for placing an IV includes the following steps:
- Apply a tourniquet to the middle third of the shoulder if you have chosen the elbow bend for venipuncture, and to the upper third of the forearm for other cases.
- Work your fist, squeezing and unclenching it. Palpate the vein. When it is sufficiently full and clearly appears under the skin, you need to clench your fist and stop moving your hand.
- With your free hand, secure the vein by pressing and lightly stretching the skin in an area 5–7 cm below the intended needle entry site.
- Perform venipuncture at an angle of 15–20 degrees until blood appears in the indicator chamber of the catheter or cannula of the injection unit of the system. The needle should enter the vein with the bevel facing up.
- Then the angle of further entry must be reduced and the needle must be inserted into the venous bed parallel to the vein almost to the base, at least 2/3 of the length.
- Now loosen or remove the tourniquet completely. Unclench your fist and relax your hand.
- Next, you need to wipe the blood from the surface of the skin with a sterile napkin and fix the injection needle (or PVK) on the skin with pre-prepared strips of plaster.
- At the last step, open the solution supply and adjust the speed by moving the clamp wheel.
During the process of intravenous infusion, it is necessary to monitor the general condition - your own or the patient's - and constantly monitor your well-being. If any adverse effects are observed, you should immediately stop the procedure and call a doctor.
If a cubital peripheral catheter is used that has not yet been installed, then it must be immediately connected to the IV system during its assembly, and the system must be filled with it. Especially if we are talking about a butterfly catheter, which has a flexible tube, in the cavity of which there should be no air during the infusion procedure. You can learn more about installing this device into a vein and the rules for its maintenance here.
Preparatory stage
Initially, you should prepare your workplace:
- the procedure is performed in a clean room;
- the surface where medicines and instruments will be placed should be disinfected;
- You need to wash your hands thoroughly.
Place on the prepared field:
- bottles with prescribed solution and medicine;
- syringe;
- tripod. If it is not available, use any hook and a plastic bag or a hook with Velcro (adhesive tape);
- ethanol;
- cotton wool;
- scissors;
- patch;
- sterile gloves;
- device (system) for intravenous infusion;
- catheter;
- medical tourniquet.

Advice: make sure that all prepared drugs correspond to those prescribed, they have not expired, the liquid in the bottles does not contain sediment, and the color corresponds to that described in the instructions.
System assembly
- Prepare a tripod or other device for hanging the bottle.
- Wash your hands thoroughly and wear sterile gloves.
- Open the bottle with the solution. Treat the rubber cover with cotton wool soaked in alcohol.
- Open the syringe package, assemble it (the needle is put on the cannula), put the instrument back into the package (its interior is sterile).
- Print out the medicine. Draw it up with a syringe and inject it into the bottle with the solution. Remove the tip of the syringe from the cap.
Next, you should assemble the medical dropper device:
- remove the instrument from the packaging;
- move the regulator wheel to the opposite position - the lumen of the tube will be pinched;
- you need to find the end where the needle is;
- stick its tip into the cap of the bottle with the solution;
- there is another needle in the bag with the dropper; it is stuck next to the lid of the bottle;
- you need to find the extension of the system (the shape is a cylinder), where you need to squeeze it hard 2-3 times. This part is designed to control the rate of drug administration. After squeezing, it will be filled with solution approximately to the middle;
- put the free end of the device back into the packaging;
- move the dispenser wheel up;
- let the solution fill the system;
- when the liquid begins to pour out from the free end, lower the dispenser wheel down;
- inspect the device - you need to make sure that there is no air in it. Use the wheel on the regulator to drain some of the solution along with any air bubbles;
- Insert the free end of the dropper into the second unoccupied needle, which is inserted into the lid of the bottle with the solution.
The home drip system is ready for use.
Introduction
The bottle with the solution is raised up to a height of at least 1.5 m - installed on a tripod or suspended in another way available at home. The prepared tools should be located within reach.
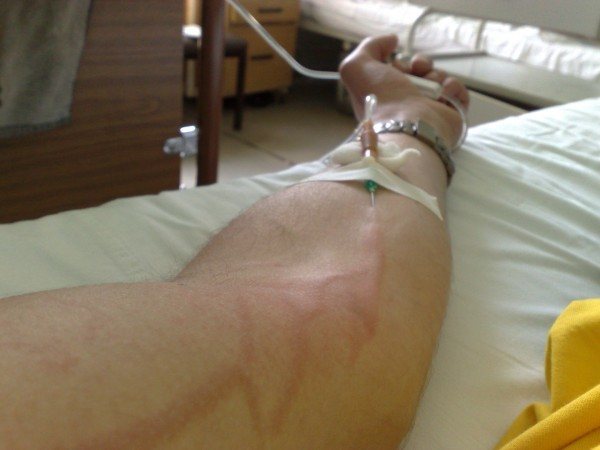
Tip: the optimal place for self-infusion is the bend of the elbow or the front side of the palm. It is easier to find veins there, because the needle must clearly enter the venous vessel. Veins of the lower extremities are not recommended due to the increased risk of blood clots.
How to place an IV:
- pull your hand 10-15 cm above the elbow with a tourniquet, clench your hand into a fist and place your hand on a hard surface. Feel for the most visible and largest vein. Disinfect the injection site.
- Place the system in the working position - press the selected vein with the thumb of your left hand (fix it) below the intended injection site. With your right hand, take the needle that is installed at the second end of the system, point its cut upward and pierce the skin parallel to the vein, and then the vein itself at an angle of 45º. When it enters a venous vessel, you will feel a “failure”. Secure the device with a bandage at the point where it connects to the vein. If it is necessary to administer drugs intravenously for a long time, venous catheterization is performed. In any case, you need to find a suitable place and install a catheter;
- check the accuracy of the hit - dark red venous blood should appear from the other end of the needle;
- Lower the control wheel to select the optimal feed speed. If there are bubbles in the bottle, reduce it;
- release the tourniquet, unclench your fist. If a bulge forms at the insertion site of the IV, immediately close it and remove it from the vein.
At the end of the procedure, the regulator wheel rises up and the device is removed from the vein. The injection site is wiped with cotton wool soaked in alcohol and sealed with an adhesive plaster.
Safety
How to put in an IV without harming yourself:
- work only with newly opened sterile gloves;
- Do not administer drugs near areas affected by purulent inflammation;
- if thrombophlebitis is diagnosed, the procedure is prohibited;
- It is better to lie down during the IV drip, but you should not sleep - you should monitor the operation of the system and its integrity;
- After the drip, it is advisable to lie down for some more time (30-40 minutes); you should not get up suddenly.
Tip: To properly administer intravenous injections, the nurse needs experience. A newbie who is about to make his debut as a medic also needs a senior companion who can carry out the procedure and explain how the procedure should go to avoid problems.
Republished by Blog Post Promoter
Can I drink alcohol after getting a flu shot?