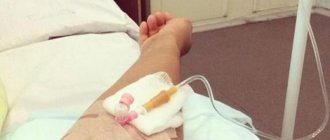
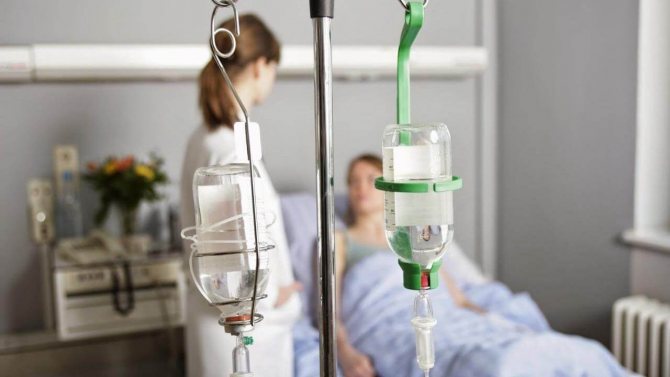
Placing an intravenous drip is one of the methods of infusion therapy with drugs that are available in the form of an injection solution. The use of this method of treatment allows you to speed up the process of delivering the active substances of the drug to the patient’s body.
Intravenous drips are used as part of complex therapy or as an independent drug. The algorithm for setting up the infusion system is carried out in accordance with the regulatory requirements of SanPin 2.1.3.2630-10.
Indications for placing an intravenous drip, goals
The algorithm for placing an intravenous drip is mandatory for medical workers of all categories.
This type of infusion therapy is indicated for use in the following clinical cases:
- myocardial infarction or exacerbation of cardiovascular diseases:
- bronchial spasm;
- severe exhaustion of the body caused by prolonged fasting or chronic disease;
- extensive allergic reaction (medicinal solution intravenous drip allows you to speed up the process of removing allergens from the patient’s blood);
- cerebral stroke;
- alcohol poisoning, overdose of drugs, food, biological poisons and chemicals;
- parasitic infestations (in this case, intravenous administration of drugs can significantly increase the likelihood of complete cleansing of the body with minimal stress on the liver and gastrointestinal tract);
- electrolyte imbalance;
- atherosclerosis of blood vessels;
- dehydration of the body;
- complex therapy of oncological diseases;
- prolonged vomiting or diarrhea;
- burns of large areas of the body;
- heavy blood loss;
- neurological diseases;
- inflammatory and infectious processes in the body.
The algorithm for placing an intravenous drip is enshrined in medical regulations. Infusion of drugs is prescribed to patients who have undergone surgery or severe trauma. Medicines entering the general bloodstream accelerate the process of tissue regeneration, prevent inflammation and the development of bacterial infection.
Puncture sites
Setting up an intravenous drip involves injecting a medicinal solution.
Depending on the condition of the patient’s blood vessels, the following areas of the body can be used to perform the puncture:
- the forearm, where the ulnar vein passes (this site for injection of drugs is used in most cases);
- the outer side of the hand, if it was not possible to perform a puncture in the forearm area;
- the upper part of the foot (this area of the lower limb is used extremely rarely).
In emergency situations, when the patient is unconscious, urgent medical care is required; puncture with a needle of the infusion system can be performed into the jugular vein. Installing an IV in this area of the body requires a high level of qualification from a medical professional.
Intravenous infusion: indications, goals, puncture sites
Intravenous drip administration of drugs and nutrients is carried out if the patient has indications. The nurse strictly follows the doctor's prescription.
Indications and purposes:
- restoration of circulating blood volume (CBV)
- detoxification of the body
- normalization of water-electrolyte balance and acid-base balance in the body
- parenteral nutrition
Venipuncture sites
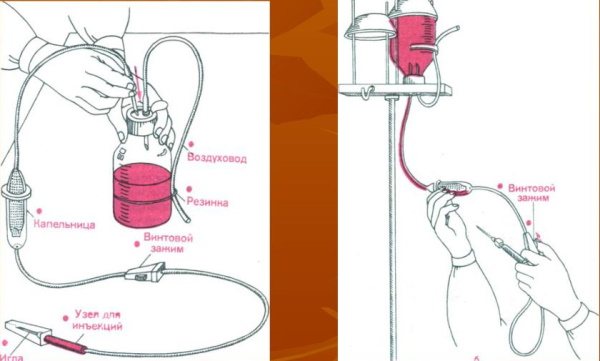
The drip system for infusions is designed in such a way that at one end there is an air duct needle for piercing the bottle cap, and at the other there is a cannula for connecting to the injection needle. To introduce the solution into the lumen of the vein, it is necessary to perform venipuncture (from the Latin vena - vein, punctio - to prick).
Well-defined veins are most easily punctured. The veins closest to the skin are:
- inner surface of elbow folds
- forearms
- back of the hand
When piercing a vein, it is important to consider the duration of the procedure and position the needle so that the patient is as comfortable as possible. Repeated intravenous infusion and administration of a large volume of fluid may serve as indications for the use of an intravenous catheter instead of a needle.
Patient preparation
The algorithm for placing an intravenous drip requires mandatory preparation of the patient.
In this case, you will need to perform the following steps:
- Explain to the patient that an intravenous drip will now be installed.
- Explain to the patient the purpose of infusion therapy.
- Make sure that the patient is not prone to allergic reactions to medications that will be infused into his general bloodstream.
- Invite the patient to visit the toilet to empty the bladder. During the intravenous infusion, additional fluid will enter the body, which will activate kidney function.
- Help the patient take the most comfortable position, based on which vein the medication will be infused into.
At the final stage of preparing the patient, it is necessary to inquire about his well-being, as well as his readiness to install an intravenous drip. After this, you can proceed to the next stage of infusion therapy.
Preparing equipment and workspace
The table below presents a step-by-step algorithm for preparing equipment and workspace for placing an intravenous drip.
| Step by step procedure | Description of the workspace preparation process |
| Step 1: Check the infusion system. | At this stage, you will need to check the tightness of the packaging in which the system is located, as well as its expiration date. |
| Step 2. Assessing the external characteristics of the medicinal solution. | The medical professional is required to read the name of the drug, its expiration date, check the presence or absence of sediment, and the degree of transparency. |
| Step 3. Opening the package with the system. | It is necessary to unpack the sterile bag with the intravenous infusion system, and then place it on the work surface. |
| Step 4: Set up a tripod. | A tripod should be placed near the patient’s bedside, on which a bag or bottle with a medicinal solution will be attached. |
| Step 5. Disinfect the bottle cap. | The final stage of preparing the workspace and equipment is the antiseptic treatment of the stopper of the bottle with the drug. To do this, use sterile cotton wool and ethyl alcohol. Then the bottle with the infusion solution is fixed on a stand. |
After completing the preparation of the workspace and equipment, the medical worker can proceed to the next stage of setting up the intravenous infusion, which includes a set of medications, as well as connecting the system to the patient’s general bloodstream.
Preparation for the procedure
It is necessary to prepare for intravenous infusion:
- patient scheduled for infusion
- a medical professional about to perform a procedure
- workspace and equipment
Patient preparation
The nurse establishes a trusting relationship with the patient: introduces herself to him, informs him that the doctor has prescribed an intravenous infusion, and makes sure that he has received written consent to carry out the “intravenous infusion” procedure. The health worker explains to the patient the purpose of administering the drug by drop method, the essence and course of the procedure.
The nurse should ask whether the patient has previously taken intravenous infusions, how he tolerated it, and if “yes,” whether there have ever been any allergic reactions. Everything heard from the patient is reported to the attending physician.
The patient is asked to empty the bladder before the procedure and then take a comfortable semi-sitting or semi-lying position on a couch or bed.
Preparing equipment and workspace
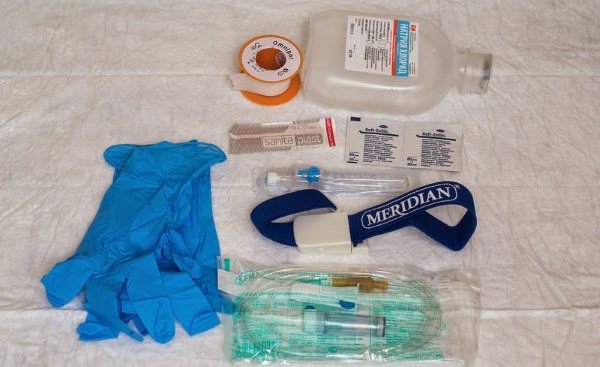
Instruments, medicines, consumables and disinfectants are checked for availability and validity of expiration dates. To carry out the procedure you will need:
- Hand washing soap
- Disposable towels
- Skin antiseptic for hand treatment
- Disposable non-sterile gloves
- Disposable sterile gloves
- Manipulation table
- Sterile tray
- Non-sterile waste tray
- Venous tourniquet
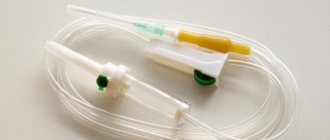
- Disposable IV Infusion System
- Injection needles
- If necessary, an intravenous catheter and a fixing patch for it
- Scissors or tweezers for opening bottles
- File for opening ampoules
- Alcohol wipes or sterile cotton balls + antiseptic for treating ampoules, vials and the patient’s skin (70% alcohol or other)
- Sterile gauze wipes
- Puncture-resistant container for collecting sharps waste of class B
- Containers for collecting waste of classes A and B
- Disinfectant or ready-made disinfection solution
- Tripod (stand) for intravenous infusion system
- A pillow for placing under the venipuncture site
- Bed or couch
- Fixing bandage
- Necessary solutions and medications as prescribed by the doctor
Read also: Vacuum blood sampling: system components, procedure algorithm
Medical worker training
The nurse washes her hands hygienically and dries them with a disposable towel. With clean hands, put on a medical mask, safety glasses, and a disposable plastic or oilcloth apron. The skin of your hands should be treated with a skin antiseptic. After your hands are dry, put on clean gloves.
Direct preparation for the procedure
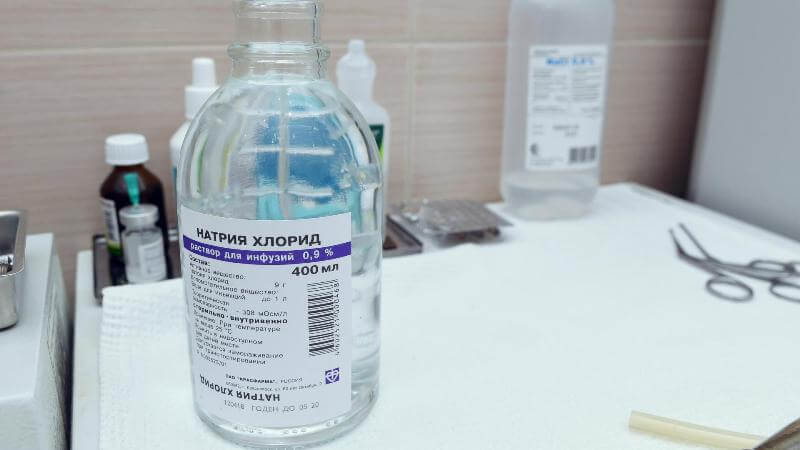
- Check the bottle with the solution for relevance of the expiration date, evaluate the color, transparency, make sure there is no sediment or external damage.
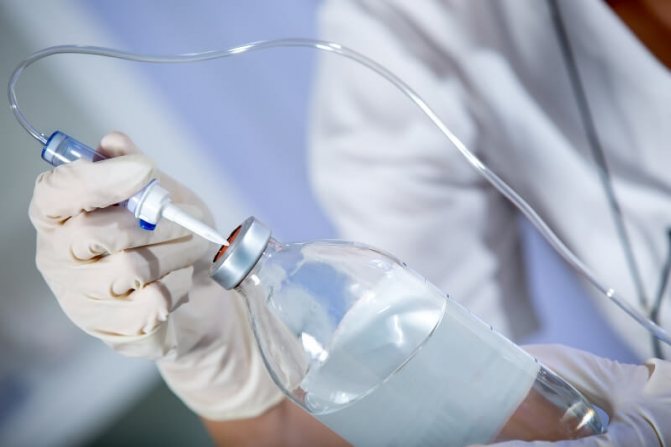
- Using tweezers or scissors, open the central part of the metal cap of the bottle, then treat the rubber stopper of the bottle with an antiseptic napkin.
- If necessary, introduce a solution of the medicinal substance from an ampoule or small bottle into a bottle with a solvent.
- Check the ampoule or bottle with the medicinal substance for compliance with the name of the prescribed drug, the validity of the expiration date, transparency, absence of damage and sediment.
- Prepare a syringe for introducing the drug into the solvent.
- Treat the lid of the bottle or the neck of the ampoule with an antiseptic wipe, open the ampoule or pierce the bottle with a needle, open the syringe after checking, and draw the drug. Introduce the drug into the vial with the solvent.
- Place the used needle in a puncture-resistant container, and the used syringe in a Class B waste container.
- Make sure that the expiration date is up to date, that the packaging with the system is sealed, and check its contents.
- Open the packaging and remove the system.
- Remove the cap from the air duct needle, insert the needle into the rubber stopper of the bottle until it stops.
- Open the plug covering the air duct opening.
- Close the screw clamp of the system, turn the bottle upside down and place it on a tripod.
- Using your fingers on both sides, gently squeeze the soft dropper, filling it halfway with the solution. If the drip device is rigid, it will fill when the screw clamp is opened.
- If there is a filter in the drip device, it must be completely filled with the solution intended for infusion.
- Open the screw clamp and slowly fill the long tube of the system until the liquid is completely displaced and drops of solution appear from the injection needle, or, when using a catheter, from the connecting cannula.
- Make sure there are no air bubbles throughout the system.
- Change the needle to a sterile one, place it in a sterile tray, as well as aseptic wipes and a sterile dry wipe.
- Prepare 2 strips of narrow adhesive tape about 5 cm long to secure the system needle.
- Place a tripod with a drip system near the patient’s bed or couch, as well as a manipulation table with all the prepared equipment.
Read also: Spirometry is a method for studying the functions of external respiration
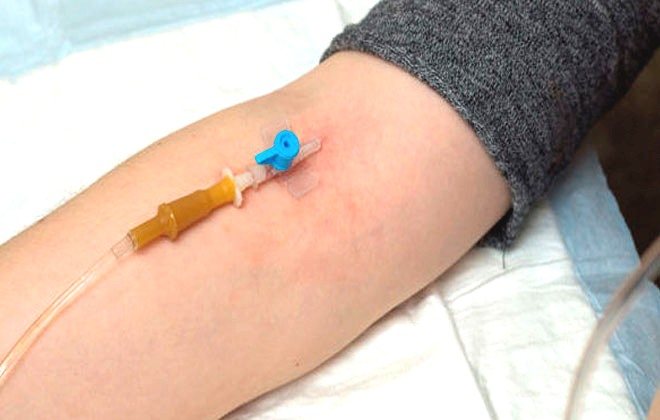
IV catheters
In the process of intravenous infusion of medicinal solutions, standard dropper systems and cubital catheters can be used. The latest medical product is used in hospitals of healthcare institutions. Cubital catheters are inserted into the vein cavity, and its upper part is fixed with a plaster on the surface of the arm.
Such manipulations are performed if the patient requires frequent and prolonged administration of medications through the use of intravenous drips. The infusion system is connected to the connector of the cubital catheter. The advantage of using this therapeutic technique is minimal trauma to the patient’s venous vessels.
How to install the system (drip)?
To set it up correctly, you need to do a little preparatory work, which will consist of the following:
- Place a drip stand next to the patient, which is a stand on which the bag with the infused solution will be attached.
- Wash your wrists and hands thoroughly with soap, not forgetting the areas between the fingers. Next, they need to be blotted dry rather than wiped. Or you can use any antiseptic intended for hand treatment.
- Check the name of the drug prepared for administration with the prescription of the treating doctor.
- Prepare the system, needle, tourniquet, fixation patch, cotton or gauze swab, alcohol solution of chlorhexidine for sterilization.
- In the package with the medicine, find the connection point to which the system will be connected and wipe it with a swab soaked in an alcohol solution.
- Attach the dropper and the bag, hang it on the stand.
- Remove all bubbles.
- Wear gloves.
- Approach the patient.
Now proceeds directly to setting up the IV:
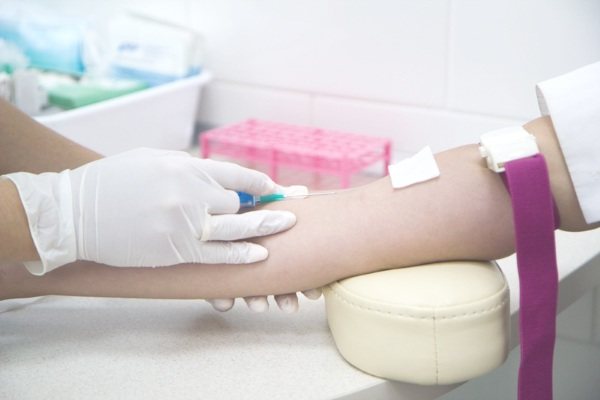
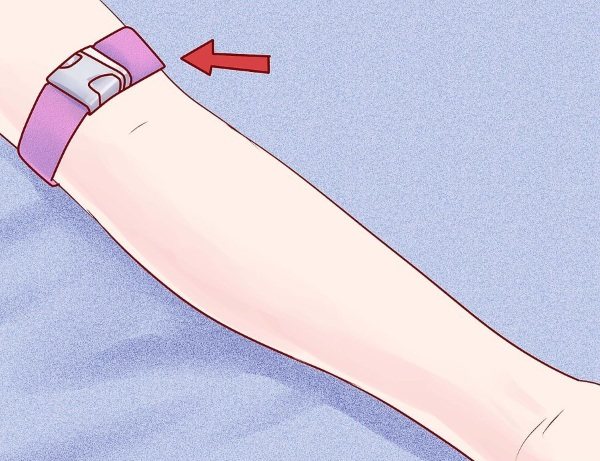
- Bandage your hand with a tourniquet over the puncture site.
- Disinfect the injection site.
- Install a catheter, which is a small tube that is inserted along with the needle, and after it is removed remains in the vein. Place it at an angle of 30 degrees to the patient's arm. Next, remove the needle and remove the tourniquet. Wipe the area where the catheter is attached with an alcohol solution.
- Attach the IV tube to the catheter, securing it with a bandage.
- Adjust the speed of drug administration using a special wheel-clamp installed on the system.
Algorithm for placing an intravenous drip according to GOST
The algorithm for placing an intravenous drip includes the preparation of a medical worker before performing therapeutic manipulations.
Preparation for the procedure
Preparation for the installation of an intravenous drip involves performing the following actions, enshrined in SanPin 2.1.3.2630-10:
- Wear a mask.
- Perform an antiseptic treatment of the skin surface of your hands, and then wait until the disinfectant solution dries completely.
- Wear disposable gloves, which must be sterile. The packaging with this type of consumable material is opened immediately before installing the dropper.
The next stage of setting up an intravenous infusion is the collection of a drug with the connection of a sterile system to the patient’s general bloodstream.
Drug kit
Recruitment of the drug is an important step in setting up an intravenous drip.
In this case, the medical professional is required to perform the following actions:
- Open the package with a sterile syringe.
- Draw into the syringe the required amount of the drug prescribed by the attending physician as the main or auxiliary means of infusion therapy.
- Add the medication to the infusion solution, which is in the bottle. These actions are performed by puncturing a rubber stopper that has undergone preliminary antiseptic treatment.
- Dispose of the disposable syringe.
The selection of the medicinal product, as well as its mixing with the infusion solution, must be performed at the stage when the tripod has already been installed, and the bottle with the medication is attached to it. When filling a syringe with an injectable drug, the healthcare worker must ensure that no air bubbles enter the therapeutic agent.
Executing the procedure
Correct implementation of the therapeutic procedure for installing an intravenous drip ensures that the patient receives the required dose of the drug, shortens the time for his full recovery, and also minimizes the risk of complications.
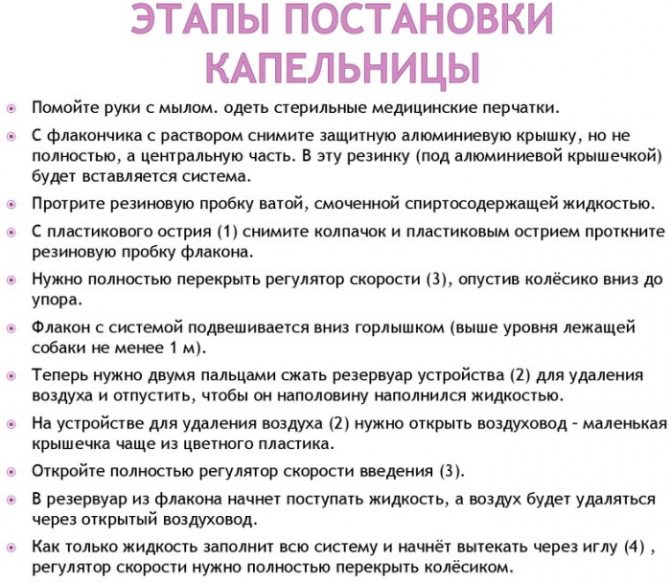
Setting up an infusion system requires compliance with the following algorithm of actions:
- Close the screw clamp of the intravenous drip.
- The needle, which is connected to the infusion system, must be inserted all the way into the rubber stopper of the glass bottle with a buffer solution and medications.
- Turn the bottle of medicine down and check that it is securely fixed on the tripod.
- Using the physical strength of your fingers, squeeze the tube of the infusion system so that it is half filled with the medicinal solution.
- Open the cap of the intravenous drip.
- Open the pre-closed screw clamp.
- Make sure that the infusion system is gradually filled with the medicinal solution, completely displacing air bubbles.
- Make sure that drops of medication begin to flow from the capped needle.
- Perform a control check of the intravenous drip for possible presence of air bubbles inside the solution bottle and plastic tube.
- Close the infusion system clamp again. These actions are performed to eliminate the factor of air getting inside the dropper.
- Attach the infusion system to the stand.
- Place cotton wool and an alcohol-based antiseptic solution in a sterile tray.
- Cut a strip of adhesive tape 4 to 5 cm long and about 1 cm wide.
- Palpate the patient's vein into which the puncture will be performed. These steps must be performed to ensure that the blood vessel is in normal condition.
- Apply a tourniquet to the surface of the middle third of the patient’s shoulder, and then ask the patient to clench and unclench his fist several times.
- Treat sterile disposable gloves with an ethyl alcohol solution.
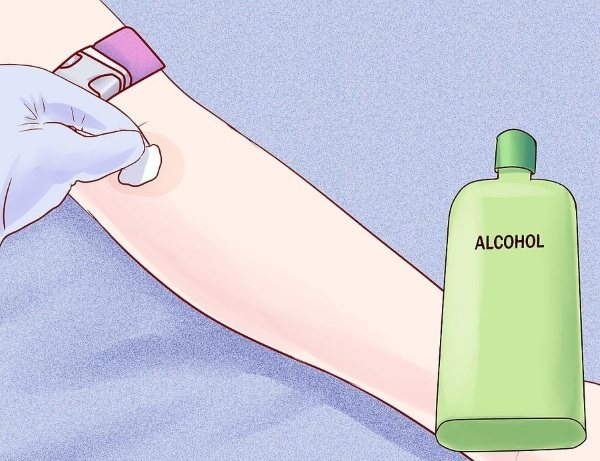
- Disinfect the skin of the hand in the puncture area. To do this, use antiseptic wipes or sterile cotton wool soaked in alcohol.
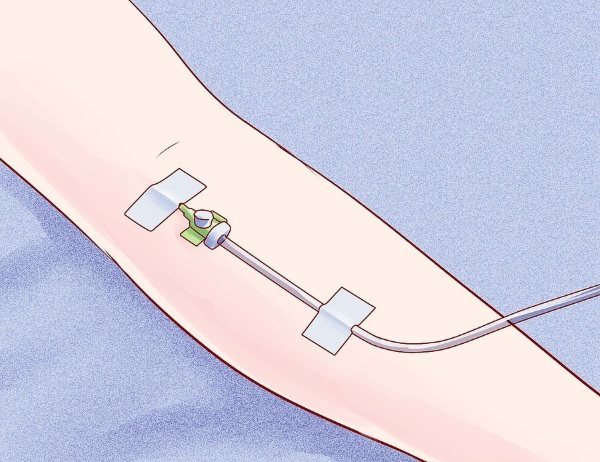
- Using your thumb, secure the venous vessel below the area of intravenous injection.
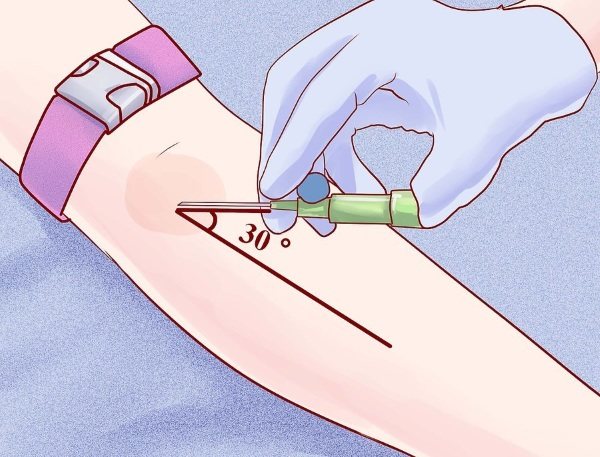
- With your right hand, insert the needle of the infusion system into the vein, holding its end with the cut facing upward.
- Make sure that dark red blood appears in the needle cannula. This phenomenon indicates that the puncture was performed successfully, and the infusion system is connected to the patient’s general bloodstream.
- Fix the needle of the intravenous drip on the surface of the patient's arm. For these purposes, a piece of adhesive tape that was prepared earlier is used.
- Ask the patient to unclench his fist.
- Untie the fixed tourniquet to restore normal blood circulation in the vessels of the upper limb.
- Open the screw clamp.
- Use the wheel to adjust the speed of infusion of the medicinal solution. In most cases, a rate of 40 to 60 drops per minute is selected. depending on the pharmacological properties of the drug.

- Begin the process of introducing the medicinal solution into the patient’s general bloodstream.
- Moisten a sterile antiseptic wipe with ethyl alcohol, and then cover the needle of the infusion system. In this case, the risk of infection of the patient’s blood is minimized.
- Remove disposable sterile gloves from your hands, and then place them in a plastic bag that does not allow moisture to pass through.
- Treat the skin of your hands with a solution of ethyl alcohol
- Wait until the disinfectant dries completely.
Throughout the entire period of infusion of the medicinal solution, the medical worker monitors the therapeutic process. A mandatory rule for placing an intravenous drip is monitoring the general condition of the patient. Particular attention is paid to the symptoms of an allergic reaction to the administered medication.
If signs of urticaria, itching of the skin and mucous membrane of the eyes, or bronchial spasm occur, further intravenous infusion should be immediately stopped. After this, the patient receives symptomatic therapy aimed at stabilizing body functions.
End of the procedure
The by-law SanPin 2.1.3.2630-10 states that upon completion of the procedure for placing an intravenous drip, a medical worker is required to perform the following actions:
- Treat the skin of your hands with an ethyl alcohol-based antiseptic solution.
- Wear disposable sterile gloves.
- Close the screw clamp of the infusion system.
- Apply sterile cotton wool to the injection site.
- Ask the patient to bend his arm at the elbow for 5-7 minutes to prevent venous bleeding.
- After 10 min. it is necessary to check that no blood is coming out of the patient’s vein.
- Recycle consumables.
- Treat the surface of your hands with an alcohol antiseptic.
The final stage of therapeutic manipulation is filling out the nursing “Procedure Log”, which indicates the time of infusion therapy, the type of drug, as well as the general well-being of the patient.
Principle of operation
The liquid from the bottle or bag, under the influence of gravity, enters the tube, passes through the droplet, again goes through the tube and then enters the vein. The filter and air valve prevent the formation of negative pressure in the system. Otherwise, the liquid will not drip. There are needles on both sides of the drip system, one of which is needed to connect to the drug container, and the other to puncture the vein. The drug enters the reservoir through a filter and is then dosed using a pipette.
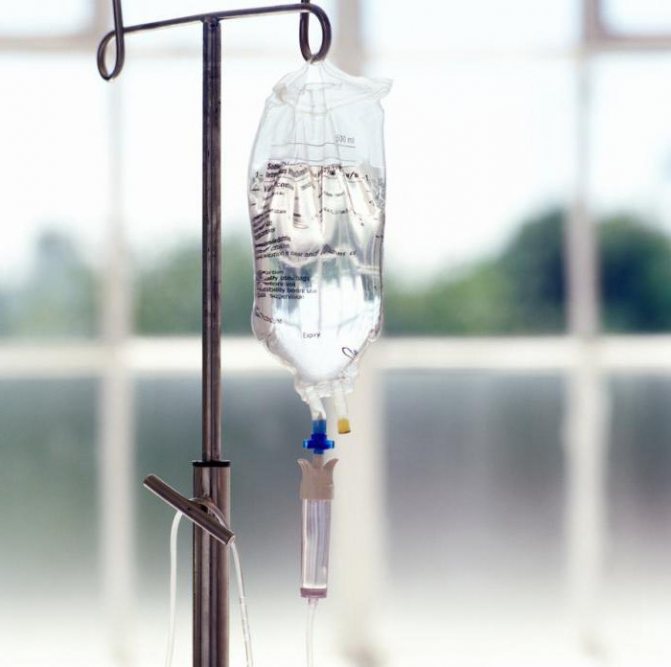
The available regulator allows you to reduce or increase the drop rate depending on how the drug is administered: drip or stream. The reservoir is initially filled with a small volume of liquid and care is taken to ensure that there is no air in the tube. To start feeding the solution into the system, a needle is inserted into the lid of the container with the drug, which is used to supply air inside, otherwise the liquid will not flow out. Currently, all medical organizations use disposable IV systems, which is the safest.
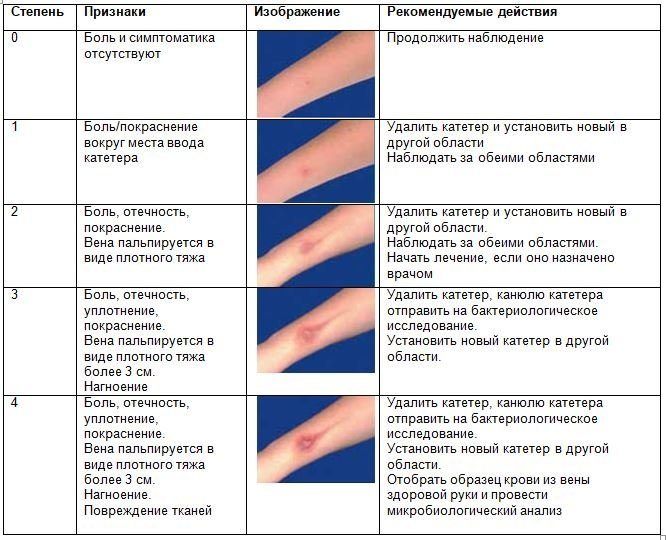
Possible complications and first aid
During intravenous infusion, it is necessary to constantly monitor the patient's condition.
In this case, the following complications cannot be excluded:
- formation of an extensive hematoma in the area of drug administration;
- penetration of the infusion solution into the subcutaneous tissue, which causes burning pain;
- infection of venous blood with bacterial, viral or fungal microorganisms, if the medical worker did not comply with sterility standards;
- the development of gas embolism, which is caused by the entry of air bubbles into the general bloodstream.
The last complication of infusion therapy entails loss of consciousness followed by death. Similar consequences are possible if during the execution the nurse did not make sure that there was no air inside the system.
The algorithm for placing an intravenous drip is regulated by the by-law SanPin 2.1.3.2630-10. This document contains a set of rules and regulations governing the procedure for conducting infusion therapy. Before starting intravenous infusion of a medicinal solution, a medical worker must perform antiseptic treatment of hands, prepare the work area and the patient.
The placement of an intravenous drip is carried out under strictly sterile conditions. All manipulations are performed using disposable gloves. Throughout the entire period of drug administration, the nurse monitors the rate of infusion of the medication and inquires about the patient’s well-being. After completion of the intravenous infusion, all consumables are discarded.
Infusion systems
They are used for infusion of solutions and medications in liquid form. Composition of the infusion system:
- a special device that pierces the lid and has a built-in air valve;
- dropper with filter;
- cameras;
- a flexible long tube with a clamp regulator with which the infusion is regulated.
The dropper system with filter allows you to retain clots larger than 30 microns. The product is used once. The material used in their manufacture is transparent and allows you to see air bubbles, the level of the solution, and the speed at which drops fall.