Over more than 50 years of existence, application and development of mesotherapy, in addition to the classical techniques proposed by Michel Pistor, many variations, innovations and, in some cases, even “heretical” deviations from the classics have appeared.
Each technique has its own characteristics and advantages. And each practicing doctor has his own preferences and characteristics of “hand placement”.
An educational video about fractional mesotherapy will help you master the techniques, which presents the basic techniques of mesotherapy: nappage, papular technique, the use of special nozzles, multi-injector “gun”. In addition to demonstrating techniques, the video shows mesotherapy procedures on the face and body, and treatment of alopecia. The necessary equipment and materials for the mesotherapy room are shown.
Mesopreparations are discussed in more detail in the following articles in this section.
Product catalog - preparations for mesotherapy.
Nappage
Superficial mesotherapy (“bedspread”, “picottage”).
The nappage technique is a series of frequent injections. The volume of the drug administered in each injection is 0.02 ml. Depending on the depth of drug administration, superficial, medium and deep nappage are distinguished.
Superficial nappage
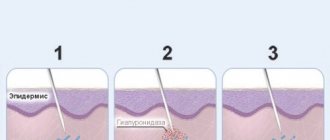
Superficial nappage is the introduction of drugs to the epidermal level, with a depth of no more than 0.5 mm. For this technique, it is more convenient to use short mesotherapy needles (4 mm). The needle is held with the cut side up.
The angle of the needle does not matter and can range from 30 to 90 degrees. The drug is injected to a depth of no more than 0.5 mm, at 1/3 - 2/3 of the needle cut. The distance between injections should be no more than 0.5 - 1 cm. This technique is used to treat the area of the face, neck and décolleté along massage lines.
If superficial nappage is performed correctly, there should be no “blood dew”, since the injections do not reach the papillary dermis.
Superficial nappage is used to administer any cocktails, with the exception of preparations with a gel consistency.
It is not advisable to use expensive cocktails with this injection technique, since the bulk of the drugs remain on the skin due to the shallow injection depth. Part of the drug is then absorbed, however, with nappage, the loss of the drug can be up to 50%.
Dry nappage - performing surface nappage without using a cocktail.
Medium nappage
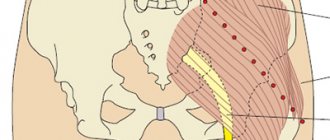
Injections are performed at the level of the dermis, at the depth of the papillary or reticular layer. This technique is used mainly in the treatment of vascular diseases of the face and body, as it allows the delivery of medicinal substances directly to the choroid plexuses of the dermis.
When working with the face, the angle of the needle is 45 degrees, the insertion depth is 1-1.5 mm, the distance between injections is 1-2 cm. The needle is held with the cut facing upward.
Injections are carried out along the vascular pattern or along massage lines.
It is possible that droplets of blood may be released at the site of some injections on the surface of the skin and the formation of microhematomas, as damage to the walls of blood vessels occurs.
Deep nappage
This technique is also called “infiltration” or “deep mesotherapy”. Deep nappage is used only in mesotherapy treatment of the body for the purpose of correcting local fat deposits and in the treatment of cellulite.
The depth of administration of cocktails should be at least 10 mm, since the drug must be delivered to the subcutaneous fatty tissue.
To perform deep nappage, needles 13 mm long are used. The needle angle is 90 degrees.
Using deep nappage, mainly lipolytic drugs are administered.
Increasingly, the NAPPAGE technique is reproduced using convenient and easy-to-use devices for fractional mesotherapy or electronic mesoinjectors.
Intravenous jet infusion technique
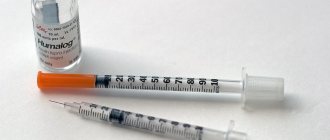
Purpose: therapeutic Indications: doctor's prescription Places: veins of the elbows and hands Prerequisite: manipulation is carried out in the treatment room of a clinic or hospital Equipment: - soap - individual towel - gloves file for opening ampoules - necessary medications sterile tray for syringe cotton balls in 70% alcohol skin antiseptic - sterile disposable syringe 10-20 ml - needle 09x40, 08x30 or 08x40 - sterile tweezers in a sterile diaper (or napkin) oilcloth pillow - venous tourniquet - napkin or disposable diaper - Anti-HIV first aid kit » - sterile rags - containers with disinfectant solution (3%, 5%) - bag for dirty linen
Technique for performing intravenous injection:
1. Wash your hands with soap, dry with an individual towel, treat with a skin antiseptic; 2.Check the expiration date and tightness of the syringe packaging. Open the package, assemble the syringe and place it in a sterile kidney-shaped tray; 7 3.Check the name, expiration date, physical properties and dosage of the drug. Check with the appointment sheet; 4.Take 2 cotton balls with alcohol using sterile tweezers and drop them into your palms. Process and open the ampoule; 5.Draw the required amount of medication into the syringe; 6. Discard the protective cap from the needle and the empty ampoule into the waste tray (except for ampoules for potent and narcotic drugs); 7.Place the syringe in a sterile tray; 8. Place sterile cotton balls (at least 4 pieces) in a sterile tray on the piston side; 9.Explain to the patient the procedure; 10.Sit or lie down the patient. Place an oilcloth pillow under the elbow for maximum extension of the arm; 11. Place a venous tourniquet through a disposable diaper or napkin (or on clothing) onto the middle third of the shoulder so that its free ends are directed upward and the loop downward. Ask the patient to pump his fist; 12.Wear sterile gloves. Remove talc from their surface with a cotton ball and alcohol; 13. Palpate the most accessible and filled vein, use a cotton ball with a skin antiseptic to treat the entire area of the elbow bend (from bottom to top); 14.Ask the patient to make a fist, then treat the injection site with a cotton ball with a skin antiseptic; 15. With the thumb of your left hand, pull the skin of the elbow bend towards you, fixing the vein; 16. Take the syringe in your right hand, holding your index finger on the cannula of the needle, position the needle with the bevel up, carefully pierce the skin and vein parallel to the surface (in one or two steps) and advance the needle 1/3 of the length along the vein until you feel it enter a void or the appearance of blood in the cannula and syringe barrel; 17.Pull the plunger towards you with your hand so that blood appears in the syringe barrel; 18.Untie the tourniquet by pulling one of the free ends, ask the patient to unclench his fist, pull the piston toward you again to check the contact of the needle with the vein; 19.Administer the medication without changing the position of the syringe; 20.Apply a cotton ball with skin antiseptic to the injection site and remove the needle from the vein; 21.Ask the patient to bend his arm at the elbow joint, leaving the ball in place until bleeding from the puncture site completely stops; 22. Having found out the patient’s well-being, take the cotton ball and walk him to the office door. Infectious safety: 1. Rinse the syringe with the needle in the 1st container with 3% chloramine solution; 2.Soak the cylinder and piston in the 2nd container with 5% chloramine solution; 3. Place the needle in the 3rd container for 60 minutes; 4.Soak the cotton ball with blood along with all the cotton balls in a container with 3% chloramine solution for 120 minutes; 5.Place the napkin or diaper in a dirty laundry bag; 6. Treat the oilcloth pad, venous tourniquet and manipulation table twice with 3% chloramine solution; 7.Remove gloves and soak them in 3% chloramine solution for 60 minutes; 8. Wash your hands with soap, dry with an individual towel, and treat with a skin antiseptic. Note: Release any remaining air from the syringe barrel into the ampoule or vial.
Papular technique
The technique involves the formation of papules of various sizes in order to improve the deposition of medicinal substances.
Mesotherapy papules vary in diameter, as well as in the depth of injection of cocktails. The advantage of the papular technique is the maximum prolongation of the therapeutic effect of the drugs.
Superficial papules, micropapules. Superficial papules are produced in areas with poorly defined subcutaneous fat (frontal, paraorbital zygomatic areas, angles of the lower jaw).
The depth of introduction of cocktails is 1-2 mm, the angle of inclination of the needle is 10-15 degrees. The needle is held with the cut side up.
The diameter of the papules should not exceed 1.5-2 mm. Using this technique, you can introduce any cocktails.
Medium papules are used to treat intradermal vessels on the face and body. Cocktails are injected to a depth of 2-3 mm, the angle of the needle is 45 degrees, the diameter of the papules is 2-4 mm.
Microinjections
The drug is injected through a needle to a depth of 1-2 mm to form a papule. Used to rejuvenate and improve the condition of the skin of the hands, face, décolleté and neck. The equipment includes the following types:
- “Point by point” is a multipuncture technique (implies many point injections), which simulates the linear administration of the drug; injections are carried out close to each other along the wrinkles with the formation of a papule with a diameter of no more than 1 mm;
- Papular - the formation of a papule by introducing the drug at an angle of 45° (areas of application - cheeks, forehead, lower jaw, cheekbones, area around the eyes);
- “Picotage” are microinjections introduced into the surface layer of the skin at a distance of 10 mm from each other.

Additionally, we can highlight the innovative cannula method of administering the drug, which is performed not with an ordinary sharp needle, but with the help of a cannula (a blunt-tipped needle that has a small hole on the side for removing the drug). To better understand the difference between these two instruments, it is better to look at their photos.
This technique is considered one of the safest, since a standard needle can damage blood vessels and capillaries, but a cannula cannot. You can look at reviews regarding this technique on the Internet.
Retrograde-linear technique
This technique is the most difficult for novice mesotherapists. The technique consists of forming a linear channel in the dermis and filling it evenly as the needle moves back.
This technique is used in the treatment of wrinkles, stretch marks, and scars. In this way, drugs with a gel consistency are preferentially administered.
There are many varieties of retrograde-linear technique, which differ in the configuration of individual channels:
- tracer;
- tunnel;
- fan;
- reinforcement technique (“mesh”).
MANIPULATION No. 109 “INTRAVEIN INJECTION TECHNIQUE”
Purpose: administration of a medicinal solution intravenously.
Indications: determined by the doctor.
Contraindications: determined by the doctor.
Equipment: on the tray: syringe with medicinal solution 20 ml, 40 mm needles, cotton balls, napkin; rubber band, roller, 70% ethyl alcohol, waste material tray, containers with disinfectant.
The injection area is where the veins appear: the pits of the elbow, the outer surface of the hand.
Sequencing:
After drawing up the medicinal solution, the nurse remains wearing gloves and a mask.
1. It is convenient to sit or lay the patient down.
2. Place the patient's hand on the table.
3. Place a cushion under the patient’s elbow.
4. Apply a rubber tourniquet to the middle third of the shoulder, placing a napkin under it; the free ends of the tourniquet should be directed in the direction opposite to the injection site.
5. Ask the patient to clench and unclench his fist several times to better fill the veins with blood, fix it in a compressed position.
6. Determine the injection site (a well-filled vein in the area of the elbow fossa).
7. Take two balls moistened with alcohol and treat the injection site with them successively, first the large surface, then the puncture site itself; place the balls in the waste tray.
8. Take the syringe in your right hand, placing the second finger on the needle cannula, the fifth on the piston, the rest on the cylinder, hold the needle with the bevel facing up.
9. Fix the vein with the thumb of your left hand, pulling the soft tissue towards you approximately 5 cm below the injection point and, without changing the position of the syringe in your hand, holding the needle with the cut up, almost parallel to the skin, pierce the skin, then carefully puncture the vein until it appears feeling of "emptiness".
10. Check that the needle has entered the vein by pulling the plunger towards you (blood should appear in the syringe).
11. Untie the tourniquet with your left hand, ask the patient to unclench his fist.
12. Pressing the piston with your left hand, slowly inject the medicine, leaving 0.2-0.5 ml in the syringe.
13. Take a ball moistened with alcohol and press it to the injection site, remove the needle, ask the patient to bend his arm at the elbow.
14. Place the syringe in the waste tray.
15. Check the injection site; if there is no blood, remove the ball into the waste tray.
16. Disinfect the tourniquet, roller, syringe, needle, and balls. ,
17. Remove gloves, place in a container with disinfectant, and wash your hands.
Complications: allergic reaction, hematoma, air embolism, phlebitis, thrombophlebitis, sepsis, tissue necrosis in the injection area.